CoachPros Documentation
Everything in one place: guides for running the day to day, and the full JSON API reference for building on top of it. Start with the guides if you run the business, or jump to the API if you are integrating with it.
Events Guide
Events
Events are anything people sign up for: a class, a workshop, a seminar, or a meetup. Every event is built from three pieces:
| Piece | What it is |
|---|---|
| Event | The class itself: its title, description, settings, and policies. Create it once and reuse it every time it runs. |
| Session | One date the event runs on. A session can cover several days in a row (a multi-day class). Add as many sessions as you like. |
| Ticket type | What people buy: a name, a price, and how many are available. Every event needs at least one, even a free event. |
Events live under Events in the Classes section of your admin sidebar. Published events appear in three places on your site:
- Your homepage: the next few upcoming classes, with a link to view all.
-
Upcoming Events (
/events): every upcoming event, with search, filters by type, price, and category, and a list or calendar view. -
The event's own page (
/events/<slug>): the description, schedule, tickets, venue, and the Register button.
Creating an Event
- Go to Events and click New Event.
- Fill in the form (explained below) and click Save Event.
- Open the event and add its dates with Add Session (see Dates and Sessions).
- Add at least one ticket with Add Ticket Type (see Tickets, Pricing, and Add-ons).
- Click Publish. New events start as drafts, and an event cannot be published until it has a ticket type.
To run a similar class, open an existing event and click Duplicate instead of starting from scratch.
Training Type
| Choice | When to use it |
|---|---|
| Scheduled (Regular) | The usual choice. You add dates, and people pick one when they sign up. |
| Prepay (No Date Selection) | People pay first and arrange a date with you afterwards. There are no sessions to pick. Use Instructions shown after payment to tell them how to book their date; it appears after checkout and in their confirmation email. Date, venue, capacity, registration, and reschedule and refund policy settings are hidden for this type. |
| Contact-Only (Schedule by Request) | No online signup. The event page shows how to call or email you. While Accept date requests is on, it is listed in the Full curriculum section below your upcoming events; tick Also show this event in the Upcoming Events grid to list it there too. |
The basics
- Title and Description: what people see on the event page.
- Slug: the end of the event's web address. It is filled in from the title. Changing it later breaks any links you have already shared.
- Instructor and Show instructor on event page: the instructor also receives students' reschedule requests for this event.
- Event Type: In-Person, Virtual (Zoom), or Hybrid (see Venues and Online Events).
- Duration: Single Day or Multi Day. This decides whether each session is one day or several (see Dates and Sessions).
- Recurrence: One-Time or Recurring. This is a label for sorting and filtering your events list; it does not create dates for you.
- Timezone: leave it on your site's default unless the class is held in a different time zone.
- Featured Image: upload an image (PNG, JPG, GIF, SVG, or WebP, up to 5MB) or paste an image address into Featured Image URL.
- Visibility: Public is listed everywhere. Unlisted is hidden from the lists but works for anyone with the link. Private is hidden completely, and its page cannot be opened.
- Categories: tick any that apply. Categories become filters on the Upcoming Events page.
Other settings on the form
- Show on community calendar: also lists the event's dates on your community calendar.
- Auto-enroll in community on purchase: adds everyone who signs up to your community.
- Disable Stage Timer push notifications: if you run the event with the Stage Timer, registered students get a "class is starting" notification in the app the first time you start it. Tick this to turn that off.
- SEO Settings: the SEO Title and SEO Description search engines show. Leave them blank to use the event's own title and description.
The remaining settings are covered in the sections below: capacity, registration, access, waivers, policies, discounts, and emails.
Dates and Sessions
Open the event and click Add Session. The Sessions tab lists them under Upcoming and Past.
- Single-day events: enter the Date, Start Time, and End Time. Optional: a Label, a Capacity Override, a different venue, and a Zoom meeting.
- Multi-day events: the button opens Add Multi-Day Session with one row per day, each with its own times and, if needed, its own venue. Use Fill Consecutive Days to add a run of days at once. A multi-day session needs at least two days; use Add Day to add another later. People sign up once and are expected on every day.
- Recurring classes: add each date as its own session. Dates are never created automatically.
Each session has buttons to Edit, Add Student, Move All Attendees, Close Registration, Cancel, and Delete. Each day of a multi-day session can be edited or cancelled on its own.
Cancelling a date
- Cancel keeps the session on record, marked cancelled. Delete removes it permanently.
- To retire a whole event, use Cancel Event on the event page, or Delete on the Events list (which cancels it). An event with active registrations cannot be deleted. Once cancelled, it can be removed with Permanently Delete.
Tickets, Pricing, and Add-ons
On the event page, click Add Ticket Type. Each ticket type has:
- Name and Price.
- Admits (people per ticket): for a couple or bring-a-friend ticket, set 2. One purchase then takes two seats and collects details for both people.
- Quantity Available: how many of this ticket can be sold. Leave it blank to use the event's capacity.
- Sale Starts and Sale Ends: when this ticket can be bought. Useful for early-bird pricing.
- Sort Order: the order tickets appear in at signup, lowest number first.
- Tax Category: used when your payment processor calculates sales tax.
- Free events: add a ticket type priced at 0. Free signups skip the payment step entirely.
- Several ticket types (for example General and Student): the buyer picks one at signup.
Add-ons
Add-ons are extras bought with a ticket, such as course materials or a rental. Click Add Add-on and set the Name, Description, Price, Max Quantity Per Attendee, and Sort Order. Tick Required if every attendee must buy it. Add-ons cannot be edited after saving; delete and add it again to change one.
Discounts and member pricing
- Allow promo codes on checkout: shows a promo code box at signup. On by default.
- Enable automatic volume discounts: add tiers with Min Qty and Discount %, for example 5 or more people get 10% off.
- There is no separate member price on a ticket. To give members a better price, use a promo code (a membership level can apply one automatically), or make a members-only event (see Registration and Access).
Capacity and Sold Out
The number of seats on a session comes from the first of these that is set:
- The session's Capacity Override.
- The event's Max Capacity.
- The venue's capacity.
- Otherwise, unlimited.
- A ticket's Quantity Available can also limit sales. The session card warns you when a ticket is the real limit.
- Once a session has a capacity, its card has buttons to add or remove a seat. Capacity cannot go below the number of people already registered.
- On your site, a session shows Only N spots left! when it is nearly full and Sold Out when it is full. Sold-out dates are shown crossed out; tick Hide sold-out sessions to remove them from view instead.
- You can still add someone to a full session yourself with Add Student.
- Enable Waitlist: people on the waitlist appear on the Registrations tab as waitlisted. Move them in with Promote. Nobody is promoted automatically, and promoting does not collect payment, so arrange payment with them yourself.
Registration and Access
When people can sign up
- Registration Opens (optional): before this time the event page says when registration opens. If blank, registration opens as soon as the event is published.
- Registration Closes (optional): if blank, registration closes when the event starts.
- Close Registration on a session stops signups for that date only. A closed session is hidden from your site unless you tick Show on public page as "Registration Closed". Reopen Registration undoes it.
- A ticket's Sale Starts and Sale Ends limit when that one ticket can be bought.
Who can sign up
- Access Type: Open (Anyone) or Members Only. For members only, pick a Required Membership Level, or leave it on Any linked level.
- People do not need an account to sign up. An account is created for each attendee from their email address, so returning students see all their classes in one place.
Sending signups to another website
Set Registration Type to External (Link to Outside Site) and enter the External Registration URL. The Register buttons then open that address in a new tab. Nothing is collected on your site, so the confirmation and reminder emails in this guide do not apply. Leave it on Internal to take signups here.
Date requests
With Accept date requests on (the default), the event is listed in the Full curriculum section of your Upcoming Events page, and visitors can click Request a Date when nothing is scheduled. Requests are emailed to your company email address and listed under Date Requests in your sidebar, where you can mark them New, Contacted, or Closed. A request does not create a session; reply to the person and add the date yourself. Turn this off for one-time events you do not plan to repeat.
Venues and Online Events
- Venues: add your locations once under Venues in the Classes section of your sidebar, then pick one as the event's Default Venue. A session, or a single day of a multi-day session, can use a different venue.
- Second location and Travel notes: for a class that moves between two places, such as a classroom and then an outdoor site. The event page shows a Getting there section with the distance, drive time, and your notes.
- Online events: set Event Type to Virtual (Zoom) or Hybrid. Connect your Zoom account under Site Settings (Zoom Integration), and each new session gets a Zoom meeting automatically. You can also paste a Zoom Meeting ID and Zoom Join URL into a session yourself.
- The join link is only shown to people who signed up: in their confirmation and reminder emails, on their registration page, and as a Join Meeting button on the event page when they are signed in.
Waivers
Under Waivers on the event form, tick each waiver attendees should sign, and set each one to Required or Optional. Only active waivers that can be signed online are listed.
- Nothing is signed during checkout. After signing up, each attendee is emailed their own signing link.
- Required waivers are tracked at check-in and included when you send reminders to sign. Optional waivers (a photo release, for example) are offered and recorded, but nobody is chased for them.
- Checking in someone who has not signed asks you to confirm first.
Payments
- Connect your payment processor (such as Stripe, Fortis, or Authorize.Net) under Site Settings → Payments. Which processor takes event payments is set when your site is set up; contact support to change it.
- Paid signups only work once that processor is connected. Until then, people who try to pay see an error and are not registered. Free events are not affected. After connecting, make one test signup to be sure.
- People pay on the processor's secure payment page, then return to your site to see their confirmation.
- You get a New Event Sale email and app notification for every paid signup.
Managing Attendees
The Registrations tab on the event page lists everyone signed up, with their ticket, add-ons, session, status, waiver, payment, and attendance. Search by name, email, or phone. The Registrations page in your sidebar lists signups across all events.
Signing someone up yourself
Click Add Student, pick an existing student or enter a new one, and choose the session. Then record how they paid under Payment Method (Cash, Check, Complimentary, and so on), with an optional Payment Reference and the Amount Paid (cents), so 5000 is 50.00. Add-on prices are not added for you.
Everyday changes
| To do this | Do this |
|---|---|
| Resend a confirmation email | Resend confirmation on the attendee's row. Each attendee can be sent at most 3 in a day. |
| Move someone to another date | Move on their row, Move to another session for several you have selected, or Move All Attendees on a session. Add an optional reason and leave the email notice ticked to tell them. Their payment and ticket move with them. |
| Fix a misspelled name | Open Check-In, click Correct on their card, and choose Fix the spelling of this person's name. |
| Fix a mistyped email or swap in a different person | Open Check-In, click Correct, and choose A different person is attending. Enter the right email, and tick the option to email them the confirmation. The original buyer stays the purchaser. |
| Cancel and refund | Cancel on their row. See below. |
| Handle a reschedule request | Students who are past the cutoff or over the limit send a request instead. Review them under Reschedule Requests in your sidebar. |
Cancellations and refunds
Click Cancel on the attendee's row. The window shows what they paid, what has already been refunded, and the refund your cancellation policy suggests.
- Paid online through Stripe or Authorize.Net: enter a Refund amount (a partial refund is fine) and click Cancel & refund, or Cancel without refund. If the refund fails, the registration is left in place so you can try again.
- Paid any other way: cancel the registration here, and give the refund yourself (in cash, or in your payment processor).
- Cancelling frees the seat but does not email the attendee, so let them know.
Check-in and rosters
- Click Check-In on the event page for the check-in screen. Search for a person and click Check In (or Undo Check-In). From there you can also mark No Call No Show, Reschedule someone, Park them (set them aside to place in a session later), and add Notes. The screen also counts waivers signed and still missing.
- You can also tick Attended on the Registrations tab.
- Under Attendance Roster, each session has Print (a sign-in sheet), Export CSV, and QR sheet (QR codes people can scan to register and sign waivers).
Reschedule and Refund Policies
These settings are on the event form (they are not shown for Prepay events). Leave a number blank to skip that rule.
| Setting | What it does |
|---|---|
| Allow Reschedule | Lets students move themselves to another date from their registration page. |
| Cutoff Days | Students can move themselves until this many days before their session (1 if blank). After that, they can send you a request instead. |
| Free Reschedule Days and Late Fee (cents) | A student moving with fewer than Free Reschedule Days to go is told a late fee may apply. The fee is in cents, so 2500 is 25.00. |
| Reschedule limit (lifetime) | A student who has rescheduled this many times is flagged on the check-in screen, and has to send you a request to move again. |
| No Call No Show limit (lifetime) | A student who has missed this many classes without notice is flagged on the check-in screen. A warning only; nobody is blocked. |
| Full Refund Days | Cancelling at least this many days before the session earns a full refund. |
| Partial Refund Days and Partial Refund % | Cancelling at least this many days before earns this percentage back. |
| No Refund After Days | Cancelling with fewer than this many days to go earns no refund. |
The refund rules are shown to students as your cancellation policy on their registration page, and they decide the suggested refund when you cancel someone. Students cannot cancel on the website themselves; they contact you, and you cancel and refund from the Registrations tab.
Emails and Notifications
| Who gets it | When | Your settings | |
|---|---|---|---|
| Registration confirmation | Each attendee | When they sign up | Custom Confirmation Email Message adds a note to the standard email. Confirmation Email Override replaces it completely, and a single session can have its own override. |
| Waiver signing link | Each attendee | When they sign up | Sent when the event has waivers attached. |
| 24-hour and 1-hour reminders | Everyone registered | Before each session | Off until you tick Send reminder emails to registered students. Edit the subject and body in the 24-Hour Reminder and 1-Hour Reminder boxes for this event, or leave them as they are to use your site-wide Event Reminder template in Message Templates, if that template is turned on. |
| Session moved | Attendees you move | When you move them | Leave the email notice ticked when moving. |
| Feedback request | Attendees | Within a day after the final session | Off until you tick Enable post-event feedback collection. Add a Custom Feedback Email Message if you like. Ratings appear on the event's Feedback tab. |
| Thank-you email | Everyone registered, only checked-in attendees, or nobody, set in Who gets the thank-you email (your site default unless you change it) | Hours after the final session ends | Uses your Post-Class Follow-Up settings in Message Templates unless you choose otherwise here. Write a subject and body for this class under Thank-You Email Content, and use Send test email to preview it. |
| Payment confirmation | The buyer | After a Prepay purchase | Includes your Instructions shown after payment. |
| New Event Sale | Owners | Every paid signup | Free signups do not send this email. |
The confirmation email includes the date and time, location (or the online join link), ticket, add-to-calendar links, a link to view or manage the registration, and, for in-person events, a digital ticket for Apple Wallet. The boxes on the form list the merge fields you can use, such as the student's name and the event date.
Emailing a class yourself. In Emails, Compose, add a Class roster audience. Upcoming sessions are listed by class with how many are registered; tick one or more sessions, or a class's "all dates". Add more audiences (another class, members of a level or program, students of an online course, a tag or list) and anyone in any of them gets the email once. Review recipients shows each person and when they were last emailed; untick anyone who shouldn't get it. To reach people who signed up after you sent something, open the sent email and Duplicate it: it starts by leaving out everyone the first one reached.
Events: Good to Know
- No future dates means nothing to sign up for. When a scheduled event's last session passes, it drops out of the upcoming classes on your homepage and Upcoming Events page (it stays in Full curriculum, for date requests, while Accept date requests is on). Add new sessions to bring it back.
- An event cannot be published without a ticket type. For a free event, add one priced at 0.
- Cancelling a session or event never notifies or refunds anyone. Move or cancel the attendees first.
- Mistyped emails: if a student never got their confirmation, check the email on their registration. Fix it with Correct on the check-in screen, then resend the confirmation.
- Each email address belongs to one account. Signing someone up with an email you already have adds the registration to their existing account.
- Late Fee and Amount Paid are entered in cents: 2500 means 25.00.
For Students: Signing Up for a Class
This part is written for students. Send it to anyone who needs help signing up.
Finding a class
Open the Upcoming Events page from the site menu, or look at the upcoming classes on the homepage. Search, filter by type, price, or category, or switch to the calendar view. Click a class to see its description, dates, location, and price.
Signing up and paying
- Click Register Now (or Register next to a date).
- Pick a date and a ticket if there is more than one.
- Choose how many tickets (up to 10), then enter each attendee's name, email, and phone. Each attendee needs their own email address.
- Add any extras, and enter a promo code if you have one.
- Click Proceed to Payment and pay on the secure payment page. For a free class, click Complete Registration instead.
You do not need an account first. One is created for you from your email address.
Waivers
If the class needs a waiver, nothing is signed during checkout. Each attendee is emailed their own signing link afterwards. Please sign before the class.
Your confirmation
You see a confirmation on screen, and each attendee gets a confirmation email with:
- The date, time, and location, or the link to join an online class.
- Your ticket, and links to add the class to your calendar.
- A View or manage your registration link.
- For in-person classes, a ticket you can save to Apple Wallet.
You may also get reminder emails the day before and an hour before the class. For an online class, use the Join Meeting link in your email, or on the class page while signed in.
Changing or cancelling
- Open the View or manage your registration link in your confirmation email, or sign in and go to your Dashboard → Upcoming Events → Manage / Reschedule.
- If the class allows it, pick a new date there. If it is too close to the class, you can send a reschedule request instead.
- The cancellation policy is shown on that page. To cancel or ask about a refund, contact the business directly.
- No confirmation email? Check your spam folder, then contact the business: your email address may have been mistyped.
Groups Guide
Groups
A group is a block of seats for an organization, such as a church, a company, or a school. Everyone who takes a seat automatically gets whatever you attach to the group: a membership, courses, and events.
Use one group per organization. The seat count is how many people that organization is covered for, and the organization's own admin can manage who fills those seats, so you are not adding and removing people for them.
Paid Online vs Paid Offline
The first decision is how the organization pays, because it changes who bills, who can add seats, and what happens at renewal.
| Paid online | Paid offline (check, cash, invoice) | |
|---|---|---|
| Group price | Set a price per seat | Leave the price blank (or 0) |
| Who collects payment | The site, at checkout | You, outside the site |
| How they sign up | They buy through the group's purchase link, which creates their own group | You create their group and invite their people |
| Renewal | Automatic if the price is monthly or yearly | Manual: collect the payment and update the seat count |
| More seats | Per seat: they buy them from their group page | They pay you, then you raise the seat count |
| Who can change the seat count | Nobody edits it directly; more seats are bought | Only you |
Setting Up a Group
Groups live under Groups in your admin sidebar (in the Classes section). Click New Group and fill in:
- Name: the organization's name.
- Total Seats: how many people the organization is covered for.
- Pricing Model: choose Per Seat for online payment, so the organization pays for each seat and buys more as needed.
- Price and Billing Interval: leave the price blank for offline payment. For online payment, set the price and choose One-time, Monthly, or Yearly.
- Leader: required. Pick an existing account, such as yourself or the organization's contact. On a group you set up, this is the name on file and does not give that person any control. Use the group's Admin role for that (see Who Manages What).
- Membership Level: the membership everyone in the group gets.
After saving, open the group to attach Courses and Events. Members are enrolled and registered automatically.
Getting people in
- Invitations tab: enter emails, separated by commas. Each person gets an email, signs in with that same email address, and accepts. Invitations expire after 30 days. Someone who has never set a password can request an emailed sign-in link from the sign-in page.
- Join Link: a shareable link anyone with an account can use to join while seats are available. Share it only with the organization.
- Online payment: copy the group's Purchase Link and send it to the organization's contact. Their purchase creates their own group, with them as its admin.
Who Manages What
You manage every group from Groups in your admin sidebar: seats, price, content, invitations, members, and roles.
The organization manages its own group by signing in and opening My Groups. What they can do depends on their role in the group, which you set on the group's Members tab:
| Role | Can do |
|---|---|
| Member | Uses what the group grants. No management. |
| Leader | Add, invite, and remove members. Edit the group's description. |
| Admin | Everything a Leader can, plus buy more seats on paid per-seat groups. |
| Primary Admin | Everything an Admin can. This is usually the person who bought the group. |
Members can be added instantly from My Groups with Add Members: existing accounts are seated straight away, and new emails get an account created for them. Nobody can go past the seat count.
Common Group Scenarios
| What happens | What to do |
|---|---|
| The organization adds someone | Their admin adds them from My Groups (or you add or invite them). They get the group's membership right away. |
| They need more seats | Online (per seat): they buy seats from My Groups. Offline: they pay you, then you raise Total Seats on the group. |
| Someone leaves | Their admin (or you) removes them from the group. The membership the group gave them ends. |
| Renewal | Online: renews automatically. Offline: collect the payment, then update Total Seats if the number changed. Nothing else to do. |
| They don't renew or cancel | Remove their members from the group, which ends their memberships. |
Groups: Good to Know
- Group memberships do not expire on their own. Access ends when someone is removed from the group.
- Every email belongs to one account. To change someone's membership, work with their existing account rather than creating a new one.
Memberships Guide
Memberships
This guide is for staff. It covers the choices you make on a program or a level, and what to do when a member wants to change who is covered.
Programs and their levels live under Memberships in your admin sidebar. Open a member's membership to see their family members, billing, and waivers. Family member labels below use the default wording; a level can rename them.
Member Numbers
Under Membership IDs settings, new memberships draw the next number from your range. If your printed cards stay valid after someone lapses, choose a contact field under Give returning members their old number from. This needs auto-assign on, and your range set above every old number. When a member with a confirmed email is signed in and buying from a membership's own page, or staff add the membership from the admin form, it takes the number in that field if it's a plain number outside your range that nobody holds. Everything else gets the next number from the range, and you can correct it by hand: guest checkouts, because a typed email doesn't prove who someone is, Register sales, and anyone whose old number is still on an earlier membership here. Numbers already issued don't change. The bulk Assign Card Numbers button always uses the range.
Family Member Settings
Edit a level and turn on Offer family add-ons on this tier. The program has to support family memberships for this to appear.
- Family Member Price: what each family member costs.
- When adding a family member reaches the bill: see the table below.
- Max Family Members: enter a number, or tick No limit on family members if the plan covers a whole household. If both are empty, buyers can add family members at signup only when a price is set, and none can be added afterwards by the member or at the Register.
- Family member age limit: staff and the primary member see a flag once a dependent with a known date of birth reaches this age. Spouses aren't flagged. Nobody is removed or told automatically, so what happens next is your decision.
- Allow family members with no email: see below. You can also require a phone, address, or date of birth for each one. Members are held to this. The membership page checks only when no email is given, and the Register doesn't collect a date of birth or address, so add those on the membership afterwards.
| Setting | What happens when a family member is added |
|---|---|
| Your payment processor's default | Stripe charges now, prorated. Other processors bill from the next renewal. |
| From the next renewal | Nothing is charged today. The renewal amount goes up from the next renewal. |
| Now, prorated | The member pays today for the rest of the current term, and the renewal amount goes up too. Outside Stripe, a charge under $1 isn't taken, and the family member is simply added. |
Now, prorated is offered only where your processor can take that charge: today that's Stripe, Authorize.Net, and Fortis. Some subscriptions are billed on the processor's own schedule at its own price, such as Authorize.Net ARB, Square, or a Fortis recurring. Those bill from the next renewal even on a level set to now, and the page says so.
Authorize.Net ARB needs a person for now. When a family member is added or removed, the amount has to be changed at Authorize.Net by hand, and a support ticket opens to say so. Change it before the next renewal, or the member is billed the old amount. If a ticket is already open for that subscription, no new one opens and its amount may be out of date, so confirm the current amount on the subscription first.
Family Members With No Email
With Allow family members with no email on, a family member gets their own member number and card, and no login until an email is added.
To add an email later, edit that family member on the primary's membership. Send them an invite to set up their login is ticked by default, so untick it if they shouldn't be contacted yet.
A member can't use an email that's already in use. When you enter one, the family member is linked to that existing account and gets no invite, so check it's the right person. It's refused if it's the primary member's own email, or that person already holds this program.
To find a family member with no account at the Register, search their name and pick them from the results, which show whose membership they're on. The sale then reads For and their name, and flags them if they're over the plan's age limit.
Adding a Family Member
There are three places to add one.
- The member: Add seat on their subscription page. They review the billing change, then confirm. On a one-time membership there's no renewal to bill, so the link shows only on a level set to Now, prorated or one that allows family members with no email. It's also hidden once a subscription is set to end, unless the seat is charged today. Otherwise, add them for the member yourself. A past due membership has to update its card first, wherever the seat is added.
- The membership page: the Add button on the primary's membership.
- The Register: pick the primary member and use Add family member.
| How it's billed | What you see |
|---|---|
| From the next renewal | Nothing is charged today, and the family member is added straight away. |
| Now, on Authorize.Net or Fortis | The exact amount shows before anything is charged. The membership page asks you to confirm it, and the Register button reads Charge card and add. At the Register this needs permission to take card payments, with Hide the Card on file payment option off in the Register settings. |
| Now, on Stripe | No amount shows first. The normal Add button adds the family member, and Stripe charges the prorated amount right away. The member's own page shows the new recurring price and says a prorated charge applies. |
| Now, on a one-time membership | The seat is paid for first. The member goes through checkout, and the membership page shows Add Family Member at the Register instead of its form. This works on Stripe and Fortis. On other processors, set the level to From the next renewal to add the family member. |
Removing a Family Member
The renewal amount goes down when a family member is removed, except on Authorize.Net ARB, where it has to be lowered by hand (see Family Member Settings).
On a level set to Now, prorated, unused time on the seat usually goes on the primary member's store credit. There's no credit within 24 hours of adding the seat, or where no seat price was recorded, and a seat paid for up front never credits more than was paid for it. Members see the amount before they confirm. When you remove someone from the membership page, the credit is issued automatically and the amount shows afterwards.
When the Card Doesn't Go Through
On Authorize.Net and Fortis, nobody is added unless the charge succeeds. The wording can vary slightly by page.
| You see | What to do |
|---|---|
| The card on file was declined | Have the member update their card, then add again. |
| There's no card on file | Have the member add a card, then add again. |
| Payment is past due | Have the member update their card, then add the family member. |
| The card couldn't be charged, or the amount has changed | Nothing was added. Review the amount and try again. |
| Too many declined attempts today | Five declines block further tries for 24 hours from those attempts. Have the member update their card. |
| An earlier charge couldn't be confirmed | Don't try again. Check the payment at your processor and follow the urgent support ticket: refund it, or add the family member. Card charges for this family plan stay held for 24 hours, even after you've checked. |
| The card was charged, but the seat couldn't be saved | Don't try again. A refund has been flagged. Card charges for this family plan stay held for 24 hours. |
On Stripe the family member is added first, so a card can be declined afterwards. Check the subscription for a past due status. If you see the billing update did not reach Stripe, the family member is saved but may not be billed. Don't add them again. Check the subscription at Stripe and correct the billing.
Waivers for Family Members
A family member with no account shows each waiver they need on the primary's membership, as signed or needed. Someone with an account signs for themselves.
- A child: the primary member can use Sign for them on their subscription page. Signing needs a date of birth, so add one if it's missing. If the member sees Please ask us about this one, handle it at the counter.
- An adult or a spouse: they sign for themselves, in person or after an email is added. The primary member can't sign for them.
- At the counter: Sign now opens the same signing for whoever is in front of you. Record on paper records a waiver signed on paper. Each needs its own permission, so if a button is missing, ask someone who has it.
Once a waiver is signed, the member can't change who that family member is, but staff can. Editing the name or date of birth, even to fix a typo, starts their waivers afresh, and they'll need signing again. The waiver list shows who needs what, and doesn't block anything by itself.
Where to Find Things
- Refund a membership payment: on the membership, View all charges and refunds, then Void or refund on that charge.
- Refund a shop or Register card sale: the refund panel on the order page. A card payment taken through Split / other is refunded through Returns.
- Refund a cash or check sale, or take an item back: Returns, then New Return. Recent orders are listed, and you can search by the customer's name, email or phone, or the order number.
- Find a member at the Register: search by name, email, member number or phone.
- Ring up a donation at the Register: open Add membership / misc / search, tap it in the product list or search for it, enter the amount, then add it. The order shows who entered the amount. A donation can't go on a layaway or special order.
- Check number: at the Register, Split / other, then Check. Afterwards it's under How it was paid on the order page.
- Change a price at the Register: Change price on the line, if it's turned on in POS Settings. The reason is under Price changes on the order page.
- Notes: Notes and history on a membership, and Admin Notes on an order. The Register's Payment note prints on the customer's receipt, so type it before starting a split payment.
- Change a member number: Edit on the membership, Membership Card Number.
- Print cards: Print ID Card on a membership, or Print Cards for a filtered list.
A membership sale at the Register has to finish on a card, so cash or a check can't pay for the whole of one yet.
Appointments Guide
Appointments
Appointments let customers book one-on-one time with a staff member: lessons, consultations, or calls. Each staff member gets their own public booking page, and customers pick a type of appointment, a day, and a time.
It lives under Appointments in your admin sidebar: Booking Types (what can be booked), Staff Availability (when), and Appointments (what has been booked).
Setting Up a Booking Page
-
Your profile:
under Settings → Profile, set your Booking URL Slug, bio, and Appointment Booking Timezone. Your page is at
/appointments/<your-slug>. - Booking Types: click New Booking Type and set the name, duration, price (0 for free), location (Zoom, In Person, or Phone), and how it is paid. Optional settings cover start-time spacing, setup and turnaround time, minimum notice, how far ahead people can book, and whether customers can reschedule themselves.
- Staff Availability: tick the days you take appointments and set the hours. Use Date Overrides for a day off or different hours on a specific date.
Your booking page is live once you have a slug, at least one active booking type, and hours. The Appointments page shows what is still missing until then. Owners can set up booking types and hours for other staff using the Staff member picker on those pages.
Payments
- Online only: the customer pays when booking.
- Counter only: the booking is confirmed and the customer pays on arrival. Use Mark paid or Comp on the Appointments page.
- Both: the customer chooses.
- Free appointments never ask for payment.
Refunds for cancelled paid appointments are made in your payment processor.
Calendars and Zoom
- Google Calendar: each staff member connects their own Google account from the Appointments page. Busy times on their calendar block those times, and new bookings are added to it with the customer invited.
- Additional conflict calendar: another Google calendar that is only checked for busy times.
- Zoom: connect your Zoom account in Site Settings, and appointments with the Zoom location get a meeting link automatically.
Appointment Notifications
| Who gets it | |
|---|---|
| Booking confirmed | The customer |
| New booking | The staff member who was booked |
| Appointment moved | The customer |
| Appointment cancelled by the customer | The customer and the staff member |
Appointments: Good to Know
- Each appointment is one staff member with one customer. For bookings that need a lane or room too, a set group size, a waiver, or members-only access, use Bookable Resources and Bundles.
- The Appointments page lists your own appointments. The Bookings page lists every booking across staff, lanes, and bundles.
- Staff Availability has one time window per day.
API Reference
Introduction
Welcome to the developer API. Every endpoint listed here is served under
/api/v1
on your domain. Requests and responses use JSON, and authentication is
performed with a Bearer token.
If you prefer an interactive view, jump over to the Swagger UI where every route is listed with a live "Try it out" panel. A raw OpenAPI 3 spec is available at /api/docs/openapi.json for importing into Postman, Insomnia, or your code generator of choice.
Authentication
Most endpoints require a Bearer token. Generate one from your account
settings, then send it on every request in the
Authorization
header.
            curl -X GET "https://your-domain.example.com/api/v1/events" \
  -H "Authorization: Bearer YOUR_API_TOKEN"
Tokens are long-lived by default. Treat them like passwords: never commit them to source control, rotate them when a team member leaves, and scope them to the smallest set of permissions you need.
            {
  "error": "unauthorized"
}
GET /api/v1/instance
and the public blog routes)
do not require authentication. The rest return
401
without a valid token.
Conventions
All requests with a body must set Content-Type: application/json. Field names are
snake_case. Timestamps are ISO 8601 in UTC (for example, 2026-06-15T09:00:00Z).
Money values are expressed in cents as integers to avoid floating point
rounding.
            curl -X POST "https://your-domain.example.com/api/v1/contacts" \
  -H "Authorization: Bearer YOUR_API_TOKEN" \
  -H "Content-Type: application/json" \
  -d '{
    "email": "user@example.com",
    "first_name": "Jane",
    "last_name": "Doe"
  }'
Collection endpoints accept
page
and per_page
query parameters for pagination. Where a resource has a human-friendly
slug (events, courses) you can fetch it either by numeric id or by slug.
Partner API
The Partner API
is a secret-key, server-to-server surface
for facility-management integrators (POS, CRM, and booking systems). It
exposes the facility entities a partner needs (customers and membership
tiers, range bookings, bookable resources, scheduling and rosters, and
orders) under a single versioned base path,
/api/v1/partner
. Every endpoint is browsable with a live "Try it out" panel in the
Swagger UI
under the
partner
tag.
Authentication
Partner endpoints authenticate with a secret
X-Partner-Key
header (format sk_partner_...),
generated and rotated by an admin in Site Settings → Integrations. This is a server-to-server
secret. Unlike the public funnel key
(pk_...),
it must never be embedded in client-delivered HTML, and the public key is
rejected here. The partner API allows 600 requests per minute per source IP,
enough to fully back-fill a multi-thousand-record tenant across every list
endpoint in a single run. Every response carries X-RateLimit-Limit, X-RateLimit-Remaining,
and
X-RateLimit-Reset
headers; a 429
adds Retry-After
(seconds) so you can back off and resume from your last cursor cleanly.
            curl -X GET "https://your-domain.example.com/api/v1/partner/customers" \
  -H "X-Partner-Key: sk_partner_YOUR_SECRET_KEY"
            {
  "data": [
    {
      "id": 1024,
      "first_name": "Pat",
      "last_name": "Member",
      "email": "pat@example.com",
      "phone": "+13135550100",
      "status": "active",
      "membership": {"tier_id": 4, "tier_name": "Gold", "tier_slug": "gold"},
      "waiver": {
        "status": "signed",
        "signed_at": "2026-03-01T00:00:00Z",
        "expires_at": "2027-03-01T00:00:00Z"
      },
      "inserted_at": "2026-01-12T14:03:00Z",
      "updated_at": "2026-05-15T17:13:44Z"
    }
  ],
  "meta": {"page": 1, "per_page": 50, "total": 1}
}
401
on every partner route. The key is compared in constant time.
Pagination & incremental sync
Every list endpoint accepts
page
and per_page
(default 50, max 100) and returns a
meta
block with page, per_page, and total.
Pass
updated_since
(ISO 8601) to fetch only rows changed at or after that time. Results are
ordered oldest-change-first, so you advance a cursor to the last
updated_at
you saw and page forward without missing or re-processing a row. Money is
always integer cents.
            # Page 1: everything changed since your last cursor.
curl -X GET "https://your-domain.example.com/api/v1/partner/memberships?updated_since=2026-06-01T00:00:00Z&per_page=100" \
  -H "X-Partner-Key: sk_partner_YOUR_SECRET_KEY"

# Remember the largest updated_at you saw, then page forward with it.
curl -X GET "https://your-domain.example.com/api/v1/partner/memberships?updated_since=2026-06-14T09:12:33Z&per_page=100" \
  -H "X-Partner-Key: sk_partner_YOUR_SECRET_KEY"
Pagination and incremental sync compose: hold an
updated_since
cursor steady and walk
page
forward until a page returns fewer than
per_page
rows. Each response's
meta
block (page, per_page, total)
tells you where you are. After each run, persist the largest
updated_at
you saw as the next run's cursor, so a sync only ever processes
customers that actually changed, never the whole book.
            # Incremental customer sync: pull ONLY changed customers, 100 at a time.
#
#  - cursor  = the largest `updated_at` you have processed so far
#              (store it between runs; start with a far-past date on first run)
#  - results come back oldest-change-first, so the last row of the last page
#    is your new cursor

cursor="2026-06-01T00:00:00Z"   # load from your last run; far-past on first run
page=1

while true; do
  resp=$(curl -s \
    -H "X-Partner-Key: sk_partner_YOUR_SECRET_KEY" \
    "https://your-domain.example.com/api/v1/partner/customers?updated_since=${cursor}&per_page=100&page=${page}")

  rows=$(echo "$resp" | jq '.data | length')
  [ "$rows" -eq 0 ] && break        # no more changed customers -> done

  # ... upsert each row into your POS:
  #   - membership.tier_slug -> your discount tier
  #   - waiver.status / waiver.signed_at / waiver.expires_at
  echo "$resp" | jq -c '.data[]' | while read -r customer; do
    : # your_upsert "$customer"
  done

  [ "$rows" -lt 100 ] && break       # short page -> last page, stop
  page=$((page + 1))
done

# Persist the largest updated_at you saw as the next run's cursor.
updated_since
fixed for the whole loop and only advance it once the loop finishes. For a
one-time full backfill, page promptly (or run it during a quiet window) so
the offsets stay stable while you read.
Customers & memberships
/api/v1/partner/customers
List customers
Lean PII plus the customer's discount tier and waiver state inline. Supports search and updated_since.
/api/v1/partner/customers/:id
Retrieve a customer
A single customer by id.
/api/v1/partner/membership-levels
List membership tiers
All membership levels/tiers (id, name, slug, price_cents) to map to your POS discount rules.
/api/v1/partner/membership-levels/:id
Retrieve a membership tier
A single membership level.
/api/v1/partner/memberships
List memberships
Memberships with member identity, status, and tier block. Filter by status or membership_level_id.
/api/v1/partner/memberships/:id
Retrieve a membership
A single membership by id.
Range lanes & reservations
/api/v1/partner/range/lanes
List lanes
Active range lanes. Filter by location_id or active.
/api/v1/partner/range/lanes/:id/availability
Lane availability
Open start times for a lane. Query: date (required, YYYY-MM-DD), duration (minutes, default 60).
            curl -X GET "https://your-domain.example.com/api/v1/partner/range/lanes/12/availability?date=2026-08-01&duration=60" \
  -H "X-Partner-Key: sk_partner_YOUR_SECRET_KEY"
            {
  "data": {
    "lane_id": 12,
    "date": "2026-08-01",
    "duration_minutes": 60,
    "slots": [
      "2026-08-01T13:00:00Z",
      "2026-08-01T13:30:00Z",
      "2026-08-01T14:00:00Z"
    ]
  }
}
/api/v1/partner/range/reservations
List reservations
Reservations. Filters: lane_id, location_id, status, from, to, updated_since.
/api/v1/partner/range/reservations/:id
Retrieve a reservation
A single reservation by id.
/api/v1/partner/range/reservations
Create a reservation
Books a lane on behalf of a guest. Requires lane_id, starts_at, ends_at, and guest_name + guest_phone. Priced server-side.
            curl -X POST "https://your-domain.example.com/api/v1/partner/range/reservations" \
  -H "X-Partner-Key: sk_partner_YOUR_SECRET_KEY" \
  -H "Content-Type: application/json" \
  -d '{
    "lane_id": 12,
    "starts_at": "2026-08-01T13:00:00Z",
    "ends_at": "2026-08-01T14:00:00Z",
    "guest_name": "Pat Guest",
    "guest_phone": "+13135550100",
    "shooter_count": 2
  }'
            {
  "data": {
    "id": 6,
    "status": "reserved",
    "source": "counter",
    "lane_id": 12,
    "starts_at": "2026-08-01T13:00:00Z",
    "ends_at": "2026-08-01T14:00:00Z",
    "shooter_count": 2,
    "price_cents": 2500,
    "customer": {"name": "Pat Guest", "phone": "+13135550100", "email": null, "user_id": null},
    "cancellation_token": "r0c8X1...",
    "inserted_at": "2026-06-25T19:40:00Z",
    "updated_at": "2026-06-25T19:40:00Z"
  }
}
/api/v1/partner/range/reservations/:id/cancel
Cancel a reservation
Cancels a reservation by id.
            curl -X POST "https://your-domain.example.com/api/v1/partner/range/reservations/6/cancel" \
  -H "X-Partner-Key: sk_partner_YOUR_SECRET_KEY"
source: "counter"
(which bypasses online-only policy gates) while still enforcing hours,
closures, capacity, turnover, and overlap. Pass
source: "online"
to opt into the stricter gates.
Bookable resources & bookings
/api/v1/partner/resources
List resources
Bookable resources (bays, rooms, simulators). Filter by location_id or active.
/api/v1/partner/resources/:id
Retrieve a resource
A single resource by id.
/api/v1/partner/resources/:id/availability
Resource availability
Capacity-aware slots. Query: date (required), duration, party_size.
/api/v1/partner/bookings
List bookings
Resource bookings. Filters: status, from, to, updated_since.
/api/v1/partner/bookings/:id
Retrieve a booking
A single booking by id.
/api/v1/partner/bookings
Create a booking
Books a resource. Requires resource_id, starts_at, ends_at. Priced server-side; members-only/waiver/age gates and capacity/conflict checks are enforced.
            curl -X POST "https://your-domain.example.com/api/v1/partner/bookings" \
  -H "X-Partner-Key: sk_partner_YOUR_SECRET_KEY" \
  -H "Content-Type: application/json" \
  -d '{
    "resource_id": 7,
    "starts_at": "2026-08-01T13:00:00Z",
    "ends_at": "2026-08-01T14:00:00Z",
    "party_size": 2,
    "customer_name": "Pat Guest",
    "customer_email": "pat@example.com"
  }'
/api/v1/partner/bookings/:id/cancel
Cancel a booking
Cancels a booking by id.
Locations, scheduling & orders
/api/v1/partner/locations
List locations
Locations with address and range scheduling config (slot/turnover minutes, advance window).
/api/v1/partner/locations/:id
Retrieve a location
A single location by id.
/api/v1/partner/events
List events
Events. Filters: status, visibility, updated_since.
/api/v1/partner/events/:id
Retrieve an event
A single event by id.
/api/v1/partner/events/:id/roster
Event roster
Attendees and their check-in state. Query: event_instance_id to scope to one session.
/api/v1/partner/orders
List orders
Orders with line items (cents). Filters: status, channel, updated_since.
/api/v1/partner/orders/:id
Retrieve an order
A single order by id.
Events
Events represent scheduled sessions that users can register for. Each event has ticket types, dates, and an optional venue.
/api/v1/events
List events
Returns upcoming and past events, sorted by start time.
            curl -X GET "https://your-domain.example.com/api/v1/events" \
  -H "Authorization: Bearer YOUR_API_TOKEN"
            {
  "data": [
    {
      "id": 42,
      "slug": "annual-retreat",
      "title": "Annual Retreat",
      "starts_at": "2026-06-15T09:00:00Z",
      "ends_at": "2026-06-15T17:00:00Z",
      "location": "123 Main St",
      "ticket_price_cents": 9900
    }
  ]
}
/api/v1/events/:slug
Retrieve an event
Fetch a single event by its slug, including ticket types and add-ons.
/api/v1/events/:slug/register
Register for an event
Registers the authenticated user for a free ticket. A paid ticket, or an event with a required paid add-on, returns 422 and goes through /checkout or /mobile-checkout.
            curl -X POST "https://your-domain.example.com/api/v1/events/annual-retreat/register" \
  -H "Authorization: Bearer YOUR_API_TOKEN" \
  -H "Content-Type: application/json" \
  -d '{"ticket_type_id": 7, "quantity": 1}'
Courses & Lessons
Courses contain sections and lessons. Once a user is enrolled, they can track lesson progress and complete the course.
/api/v1/courses
List courses
Returns all courses the authenticated user can see.
            curl -X GET "https://your-domain.example.com/api/v1/courses" \
  -H "Authorization: Bearer YOUR_API_TOKEN"
/api/v1/courses/:slug
Retrieve a course
Fetch a single course by slug, including its sections.
/api/v1/courses/:slug/enroll
Enroll in a course
Enrolls the authenticated user in the given course. A paid course returns 403 unless a membership or group includes it; buy it through checkout.
            curl -X POST "https://your-domain.example.com/api/v1/courses/intro-workshop/enroll" \
  -H "Authorization: Bearer YOUR_API_TOKEN"
/api/v1/lessons/:id/complete
Mark a lesson complete
Marks the given lesson as completed for the authenticated user.
Memberships
Memberships give users access to tiered benefits and, optionally, courses gated behind a membership level. Use these endpoints to check the current user's status.
/api/v1/membership
Current membership
Returns the authenticated user's active membership, if any.
            curl -X GET "https://your-domain.example.com/api/v1/membership" \
  -H "Authorization: Bearer YOUR_API_TOKEN"
            {
  "data": {
    "id": "membership-uuid",
    "level": "Gold",
    "status": "active",
    "current_period_end": "2026-12-31T23:59:59Z"
  }
}
/api/v1/memberships
List membership history
Returns all past and present memberships for the authenticated user.
Membership Activation
When a club moves onto Pewpros from a legacy membership system, existing
members are imported but their payment cards are not: card details stay in
the old provider's vault and cannot be transferred. Each member therefore
re-enters a card once, at /activate, and their subscription is
anchored to the renewal date they already had. This section is the staff
reference for that process.
Two public pages drive it. /activate
is for members we already
hold an email address for: they enter their membership number
(the number on their physical card, never a credit card number) plus first
and last name. /claim
is for members with a card but no email on
file: they supply an email at the same time and their account is created
before they continue to payment. Both pages throttle by IP and by membership
number, and both return deliberately vague errors so the number range cannot
be probed.
A matching name and number does not always complete activation. Three further conditions are checked, and each refuses rather than taking money on an assumption:
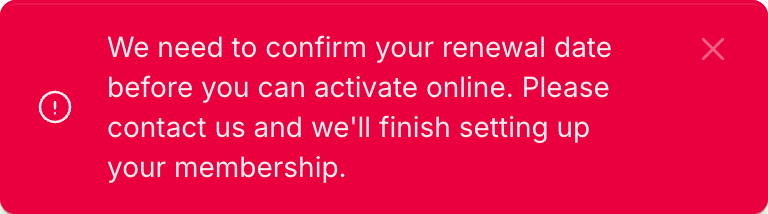
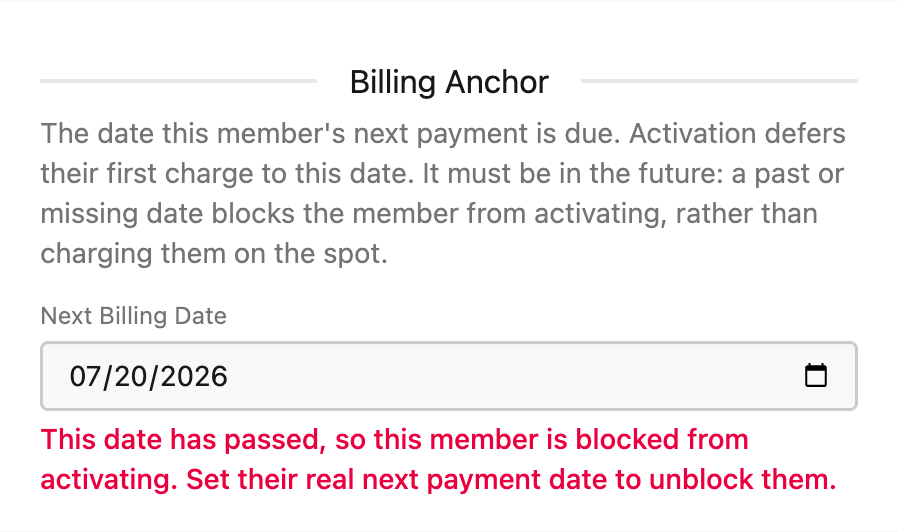
- The renewal date has passed, or is missing. The imported next-payment date is captured once, at import, and goes stale as weeks pass. Rather than charge against a date we no longer trust, activation stops and an operator sets the real date. No card is taken and no money moves.
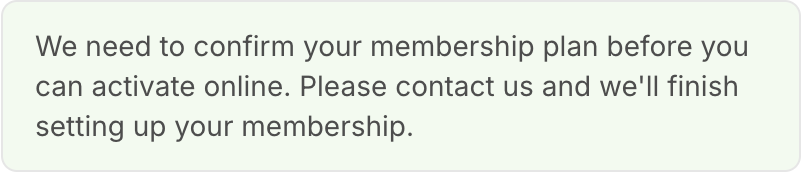
- The membership plan could not be read. Members whose plan was blank in the export sit on a $0 placeholder plan. They are paying customers whose tier is simply unknown, not free members, so they cannot activate until a real plan is set.
- The member already has a paid membership. Someone who has since bought a current plan is told there is nothing to activate, which stops a second subscription being started on top of the one they already pay.
- The plan is genuinely free. A complimentary or volunteer tier is never asked for a payment card, because there is nothing to bill.
The two blocking refusals read almost identically, so check which one names the renewal date and which names the membership plan: they need different fixes. The renewal-date refusal appears as a notice in the corner of the screen rather than inside the form, so a member may describe it as "a red box that popped up".
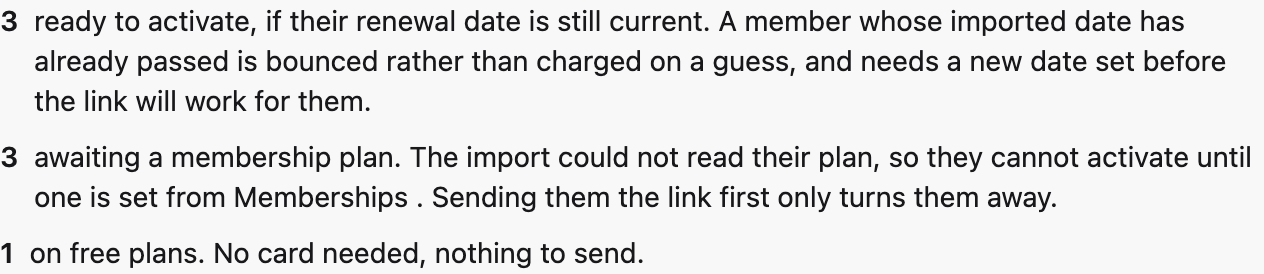
Operators work from three admin screens. Activation Links
holds the shareable link and splits the awaiting-activation population into
members who are ready to convert, members awaiting a plan, and members on free
plans; only the first is an outreach list, and a single combined total is
misleading. Legacy Claims
is the no-email queue, where staff can attach an email on a member's behalf.
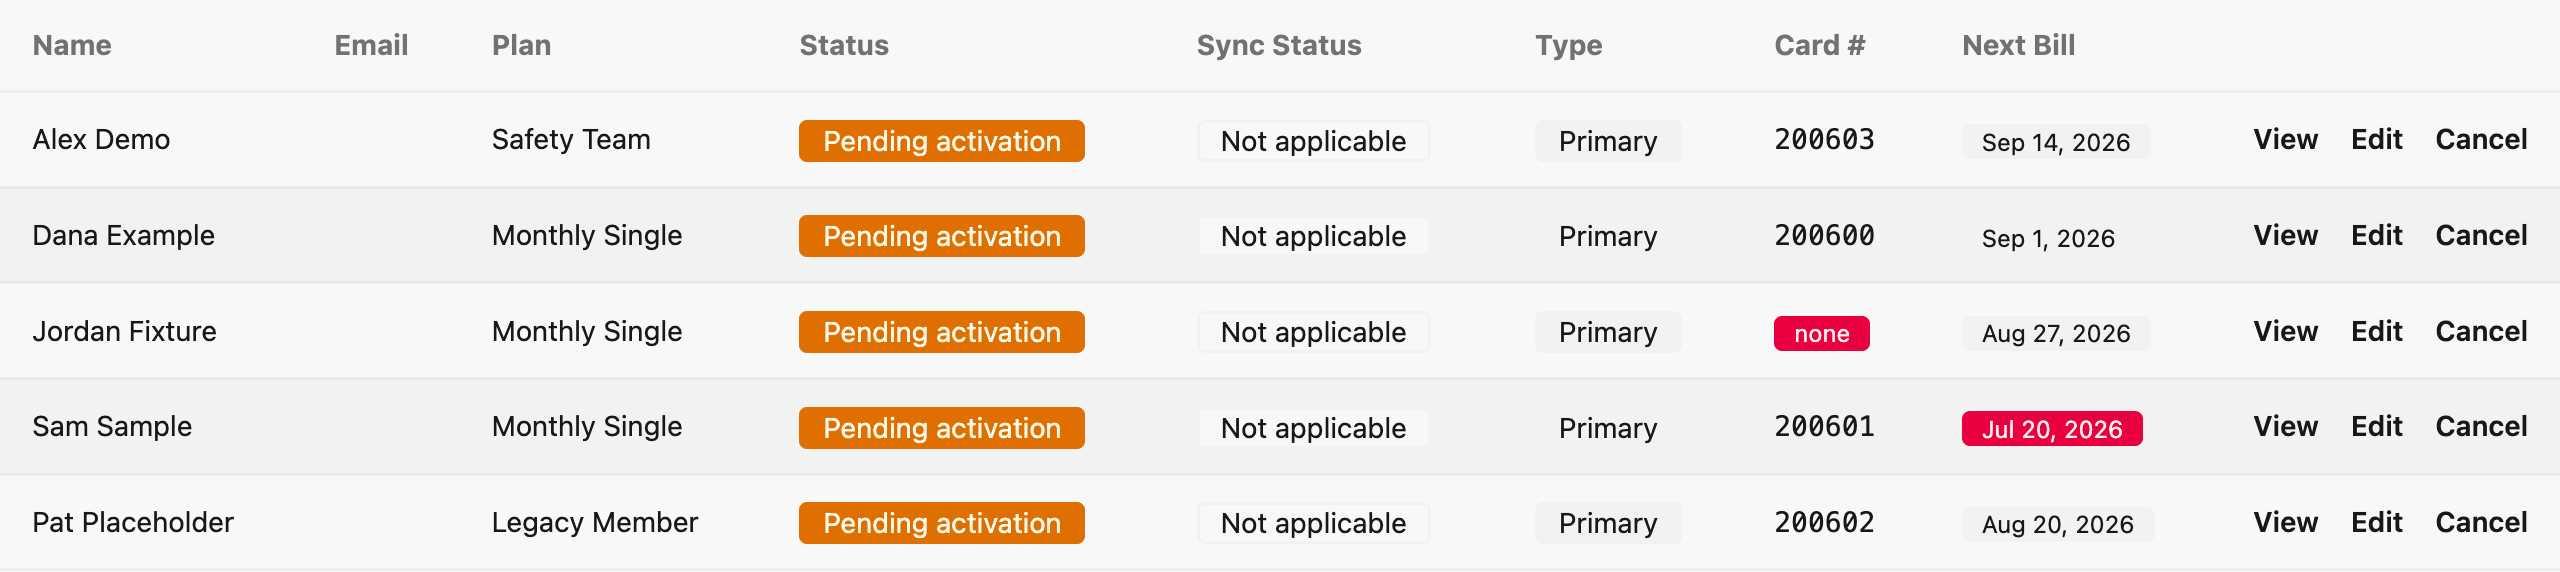
Memberships
surfaces a Card #
and a Next Bill
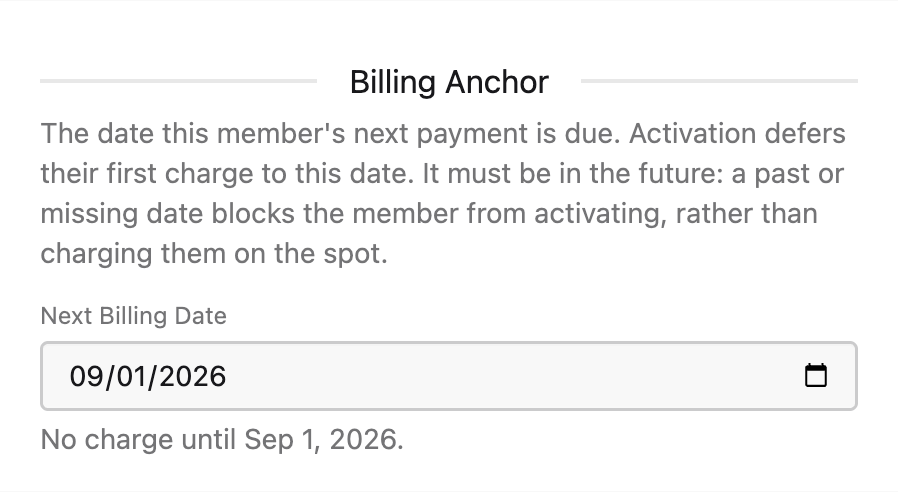
column, both badged red when they would block activation, and its Billing
Anchor field is where a blocked member's real next payment date is set.
A blocked member is unblocked by setting Next Billing Date under Billing Anchor on their record. The field tells you which way it went.
The full staff-facing version of this guide is maintained in the Pewpros
repository at docs/memberships/activation-staff-guide.md.
Groups
Groups let an organization buy seats in bulk and assign them to members (for example, a company training account). Group admins can invite new members, manage seats, and track course progress for their roster.
/api/v1/groups
List groups
Returns the groups the authenticated user belongs to or administers.
            curl -X GET "https://your-domain.example.com/api/v1/groups" \
  -H "Authorization: Bearer YOUR_API_TOKEN"
/api/v1/groups/:group_id/invitations
Invite a member
Sends an invitation to join the group to an email address.
/api/v1/groups/:group_id/seats
Seat usage
Shows how many seats are used and how many remain.
Community
The community API powers the social feed: posts, comments, likes, categories, and leaderboards. Posts are scoped to categories and respect block/report rules.
/api/v1/community/feed
Community feed
Returns a paginated feed of community posts.
            curl -X GET "https://your-domain.example.com/api/v1/community/feed?page=1&per_page=20" \
  -H "Authorization: Bearer YOUR_API_TOKEN"
/api/v1/community/posts
Create a post
Creates a new community post in the specified category.
/api/v1/community/posts/:id/like
Like or unlike a post
Toggles the authenticated user's like on the given post.
Contacts (CRM)
The contacts API is the CRM layer: create, update, tag, and note contacts; move them in and out of lists; and read their activity history.
/api/v1/contacts
List contacts
Returns a paginated list of contacts.
/api/v1/contacts
Create a contact
Creates a new contact. Email is required; other fields are optional.
            curl -X POST "https://your-domain.example.com/api/v1/contacts" \
  -H "Authorization: Bearer YOUR_API_TOKEN" \
  -H "Content-Type: application/json" \
  -d '{
    "email": "user@example.com",
    "first_name": "Jane",
    "last_name": "Doe",
    "phone": "+15551234567"
  }'
/api/v1/contacts/:id/tags
Add tags to a contact
Attaches one or more tags to the given contact.
/api/v1/contacts/:contact_id/notes
List contact notes
Returns notes attached to the given contact, newest first.
Push Notifications
The push notifications API lets your mobile app register device tokens and send notifications to users. Device tokens are bound to the currently authenticated user and can be registered for either iOS (APNs) or Android (FCM).
/api/v1/devices
Register a device token
Stores a device token for the authenticated user so they can receive push notifications.
            curl -X POST "https://your-domain.example.com/api/v1/devices" \
  -H "Authorization: Bearer YOUR_API_TOKEN" \
  -H "Content-Type: application/json" \
  -d '{
    "device_token": "APNS_OR_FCM_DEVICE_TOKEN",
    "platform": "ios",
    "environment": "production",
    "bundle_id": "com.example.yourapp"
  }'
            {
  "data": {
    "id": "device-uuid",
    "platform": "ios",
    "environment": "production",
    "active": true
  }
}
/api/v1/devices
Deactivate a device token
Marks a previously registered device token inactive so it stops receiving notifications.
/api/v1/push/devices
List your devices
Returns the authenticated user's registered device tokens. Tokens are masked in the response.
/api/v1/push/test
Send a test notification
Sends a test push to every device registered to the authenticated user.
            curl -X POST "https://your-domain.example.com/api/v1/push/test" \
  -H "Authorization: Bearer YOUR_API_TOKEN" \
  -H "Content-Type: application/json" \
  -d '{
    "title": "Hello from the API",
    "body": "This is a test notification."
  }'
/api/v1/push/send
Send a notification to a user
Sends a push notification to a specific user by email. Requires an owner, admin, or instructor role.
            curl -X POST "https://your-domain.example.com/api/v1/push/send" \
  -H "Authorization: Bearer YOUR_API_TOKEN" \
  -H "Content-Type: application/json" \
  -d '{
    "email": "user@example.com",
    "title": "Your order is ready",
    "body": "Stop by when you get a chance.",
    "data": {"type": "order_update", "order_id": "ORDER-12345"}
  }'
environment
field on a registered device must match the APNs environment your build
is signed for:
sandbox
for TestFlight and development builds,
production
for App Store releases. A mismatch will silently drop
the notification.
Live Activities
Live Activities are the iOS feature that shows real-time updates on the
lock screen and in the Dynamic Island. The API lets you start an activity
for a user, advance it through named steps, and end it when the work is
done. Each activity is described as an ordered list of
steps
(for example, ["Received", "Processing", "Shipped", "Delivered"]).
Two authentication styles are supported: your mobile app uses a Bearer
token to register update tokens for a running activity, while external
callers (automations, webhooks, CRMs) use an
X-Admin-Key
header to start, advance, and end activities by user email.
Mobile app endpoints
/api/v1/live-activities/push-to-start/register
Register a push-to-start token
Stores the push-to-start token so the server can wake the device and start a new activity.
/api/v1/live-activities/register
Register an activity update token
Stores the per-activity push token that iOS issues after the activity is live, so the server can send incremental updates.
            curl -X POST "https://your-domain.example.com/api/v1/live-activities/register" \
  -H "Authorization: Bearer YOUR_API_TOKEN" \
  -H "Content-Type: application/json" \
  -d '{
    "activity_id": "activity-uuid",
    "reference_id": "ORDER-12345",
    "push_token": "IOS_ACTIVITY_PUSH_TOKEN",
    "environment": "production"
  }'
External caller endpoints
/api/v1/push/live-activity/start
Start a Live Activity
Starts a new Live Activity for a user identified by email. Returns the activity id that you will use for subsequent advance and end calls.
            curl -X POST "https://your-domain.example.com/api/v1/push/live-activity/start" \
  -H "X-Admin-Key: YOUR_ADMIN_KEY" \
  -H "Content-Type: application/json" \
  -d '{
    "email": "user@example.com",
    "activity_type": "order_processing",
    "reference_id": "ORDER-12345",
    "title": "Order #12345",
    "subtitle": "Tracking your order",
    "steps": ["Received", "Processing", "Shipped", "Delivered"]
  }'
            {
  "success": true,
  "data": {
    "id": "activity-uuid",
    "activity_type": "order_processing",
    "reference_id": "ORDER-12345",
    "title": "Order #12345",
    "subtitle": "Tracking your order",
    "steps": ["Received", "Processing", "Shipped", "Delivered"],
    "current_step_index": 0,
    "current_step_name": "Received",
    "total_steps": 4,
    "status": "active",
    "created_at": "2026-06-15T09:00:00Z",
    "updated_at": "2026-06-15T09:00:00Z"
  }
}
/api/v1/push/live-activity/:id/advance
Advance to the next step
Advances the activity to the next step in its steps array. Accepts an optional reference_id body parameter as an alternative to the path id.
            curl -X POST "https://your-domain.example.com/api/v1/push/live-activity/activity-uuid/advance" \
  -H "X-Admin-Key: YOUR_ADMIN_KEY" \
  -H "Content-Type: application/json" \
  -d '{}'
/api/v1/push/live-activity/:id/end
End a Live Activity
Ends the activity and stops future updates. Accepts an optional reference_id body parameter as an alternative to the path id, plus an optional status (completed, cancelled, or failed).
            curl -X POST "https://your-domain.example.com/api/v1/push/live-activity/activity-uuid/end" \
  -H "X-Admin-Key: YOUR_ADMIN_KEY" \
  -H "Content-Type: application/json" \
  -d '{"status": "completed"}'
/api/v1/push/live-activities
List Live Activities
Returns all Live Activities. Filter with the status and activity_type query parameters.
/api/v1/push/live-activities/:id
Retrieve a Live Activity
Fetches a single Live Activity by id, including its current step and status.
reference_id)
rather than trying to resurrect a completed one.
Approvals
Approvals let automation steps pause and wait for a human to approve or deny
them before continuing. Two authentication styles are supported: your mobile
app uses a Bearer token to list and respond to approvals, while external
callers (automations, webhooks, CRMs) use an
X-Admin-Key
header to send interactive approval push notifications.
Mobile app endpoints
/api/v1/approvals
List approvals
Returns approvals assigned to the authenticated user. Use the status query parameter to filter by pending, approved, or denied.
            curl -X GET "https://your-domain.example.com/api/v1/approvals?status=pending" \
  -H "Authorization: Bearer YOUR_API_TOKEN"
            {
  "approvals": [
    {
      "id": "approval-uuid",
      "status": "pending",
      "requested_at": "2026-06-15T09:00:00Z",
      "responded_at": null,
      "expires_at": "2026-06-16T09:00:00Z",
      "run_id": "run-uuid",
      "step_id": "step-uuid",
      "context": {
        "summary": "Approve outbound message",
        "details": "This automation step requires human review before continuing."
      }
    }
  ]
}
/api/v1/approvals/:id/approve
Approve a request
Approves the approval request. The paused automation run resumes on the next scheduler tick.
            curl -X POST "https://your-domain.example.com/api/v1/approvals/approval-uuid/approve" \
  -H "Authorization: Bearer YOUR_API_TOKEN"
/api/v1/approvals/:id/deny
Deny a request
Denies the approval request and signals the automation run to branch accordingly.
External caller endpoints
/api/v1/admin/push/send-approval
Send an interactive approval notification
Sends a rich push notification to a user by email with inline approve/reject action buttons. The iOS app renders the actions via the Notification Service Extension and persists them to the widget store. Authenticated via X-Admin-Key header.
For simple cases, pass convenience parameters and the endpoint builds the
action buttons for you. For full control, pass a custom
approval_actions
array instead.
| Parameter | Required | Description |
|---|---|---|
| Yes | Email of the user to notify. | |
| title | No | Notification title. Defaults to "Approval Required". |
| body | No | Notification body text. |
| subtitle | No | Secondary text shown in the approval card. |
| details | No | Additional context rendered in the expanded notification view. |
| approval_id | No | Your own ID for this approval. A UUID is generated if omitted. Used to build the default approve/reject URLs. |
| approve_url | No |
Override the approve action endpoint. Defaults to /api/v1/approvals/:id/approve.
|
| reject_url | No |
Override the reject action endpoint. Defaults to /api/v1/approvals/:id/deny.
|
| approve_label | No | Label for the approve button. Defaults to "Approve". |
| reject_label | No | Label for the reject button. Defaults to "Reject". |
| auth_type | No | Authentication method the app uses when calling action endpoints. Defaults to "app_token". |
| approval_mode | No | How the approval is rendered. Defaults to "direct". |
| plugin_name | No | Source system name shown in the notification. Defaults to "PewPros". |
| expires_at | No | ISO 8601 timestamp after which the approval is no longer actionable. |
| approval_actions | No | Full custom actions array. When provided, all convenience params (approve_url, reject_url, labels, auth_type) are ignored. |
            curl -X POST "https://your-domain.example.com/api/v1/admin/push/send-approval" \
  -H "X-Admin-Key: YOUR_ADMIN_KEY" \
  -H "Content-Type: application/json" \
  -d '{
    "email": "user@example.com",
    "title": "New Instructor Application",
    "body": "John Smith has applied to become an instructor.",
    "subtitle": "Review and approve or reject this application.",
    "approval_id": "instr-app-42",
    "approve_label": "Accept",
    "reject_label": "Decline"
  }'
            {
  "success": true,
  "sent_to": "user@example.com",
  "result": {
    "total": 1,
    "successful": 1,
    "failed": 0
  },
  "data": {
    "type": "interactive_approval",
    "notification_type": "approval",
    "id": "approval_instr-app-42",
    "plugin_name": "PewPros",
    "category": "approval",
    "approval_required": true,
    "approval_mode": "direct",
    "item_title": "New Instructor Application",
    "item_subtitle": "Review and approve or reject this application.",
    "item_details": "",
    "status": "pending",
    "timestamp": "2026-06-15T09:00:00Z",
    "approval_actions": [
      {
        "action_id": "approve",
        "label": "Accept",
        "api_endpoint": "https://your-domain.example.com/api/v1/approvals/instr-app-42/approve",
        "method": "POST",
        "confirm": false,
        "auth_type": "app_token"
      },
      {
        "action_id": "reject",
        "label": "Decline",
        "api_endpoint": "https://your-domain.example.com/api/v1/approvals/instr-app-42/deny",
        "method": "POST",
        "confirm": true,
        "auth_type": "app_token"
      }
    ]
  }
}
            curl -X POST "https://your-domain.example.com/api/v1/admin/push/send-approval" \
  -H "X-Admin-Key: YOUR_ADMIN_KEY" \
  -H "Content-Type: application/json" \
  -d '{
    "email": "user@example.com",
    "title": "Approve Payout",
    "body": "A $500.00 payout is ready to send.",
    "approval_id": "payout-99",
    "approval_actions": [
      {
        "action_id": "approve",
        "label": "Send Payout",
        "api_endpoint": "https://hooks.example.com/payout/99/approve",
        "method": "POST",
        "confirm": false,
        "auth_type": "webhook_hmac"
      },
      {
        "action_id": "reject",
        "label": "Hold",
        "api_endpoint": "https://hooks.example.com/payout/99/hold",
        "method": "POST",
        "confirm": true,
        "auth_type": "webhook_hmac"
      }
    ]
  }'
expires_at
passes, the approval is no longer actionable and the automation run will
follow its configured timeout branch.
Automations
Automations are event-driven workflows that run automatically when a trigger fires. You can build automations visually in the admin panel or create them via the MCP tools. Each automation has a trigger type, an optional trigger config for filtering, and a definition containing the workflow nodes and edges.
Supported trigger types include membership_created, course_enrolled, event_booked, payment_received, webhook_received, schedule,
and more. Automations must be activated before they respond to events.
Workflow nodes represent individual steps such as sending an email, adding a
CRM tag, creating a delay, or branching based on a condition. The visual builder
at
/admin/automations/:id/build
lets you drag, connect, and configure nodes.
Automation lifecycle
| Status | Description |
|---|---|
| draft | Newly created. Will not respond to trigger events. |
| active | Listening for trigger events and creating runs automatically. |
| paused | Temporarily stopped. Existing runs complete but no new runs are created. |
| archived | Retired. Hidden from the active list. |
Approval gates
Any automation node can be configured to require approval before executing.
When a run reaches an approval node, it pauses and sends a push notification
to the admin. The run resumes when the approval is granted via the mobile app,
the web UI, or the
/api/v1/approvals/:id/approve
endpoint (see the
Approvals
section).
Webhook Triggers
Automations with trigger type
webhook_received
get a unique, unguessable webhook URL. Any external system can fire the
automation by sending a POST request to that URL. The URL uses a UUID path
segment that is auto-generated when the automation is created.
/webhooks/automation/:uuid
Fire a webhook automation
Sends a JSON payload to trigger all active automations matching this webhook path. Returns a correlation ID for tracing.
            curl -X POST "https://your-domain.example.com/webhooks/automation/dd132cc3-824e-4047-8010-7c6154e6f69b" \
  -H "Content-Type: application/json" \
  -d '{
    "email": "user@example.com",
    "event_type": "signup",
    "name": "Jane Doe"
  }'
            {
  "status": "ok",
  "path": "dd132cc3-824e-4047-8010-7c6154e6f69b",
  "correlation_id": "a3bbeddb-5c15-46ab-8df7-a3415cf69def"
}
Finding the webhook URL
The webhook URL is displayed in three places in the admin panel:
- The automation Show page (with a Copy button and sample cURL)
- The Edit form (read-only field with Copy button)
- The Builder header bar
It is also returned by the MCP tools automation_get, automation_create, and
automation_list
in the
webhook_url
field.
Payload mappings
By default, the incoming JSON body is nested under
trigger.body
in the automation context. Payload mappings let you extract nested fields and
promote them to top-level trigger variables so they can be referenced as
{{trigger.user_email}}
in downstream nodes.
Each mapping has a name
(the variable name to create) and a source
(a dot-path into the trigger data). For example,
body.email
extracts the
email
field from the webhook body.
            {
  "trigger_config": {
    "path": "dd132cc3-824e-4047-8010-7c6154e6f69b",
    "payload_mappings": [
      {"name": "user_email", "source": "body.email"},
      {"name": "action", "source": "body.event_type"},
      {"name": "user_name", "source": "body.name"}
    ]
  }
}
With the mappings above, a POST with
email
in the body produces this trigger data:
            {
  "path": "dd132cc3-...",
  "body": {
    "email": "user@example.com",
    "event_type": "signup",
    "name": "Jane Doe"
  },
  "headers": {
    "content-type": "application/json",
    "x-custom-header": "value"
  },
  "received_at": "2026-04-06T04:13:55Z",
  "correlation_id": "a3bbeddb-...",
  "user_email": "user@example.com",
  "action": "signup"
}
Headers
All x-*
prefixed headers, plus
content-type
and user-agent,
are captured in trigger.headers.
You can map header values with a source path like headers.x-api-key.
Deduplication
Duplicate payloads (identical JSON body within a short window) are automatically
detected and return a
"status": "deduplicated"
response. The automation does not fire a second time. Each delivery is logged
with a correlation ID for debugging.
MCP Tools
The platform exposes an
MCP (Model Context Protocol)
server that lets AI agents interact with every feature programmatically. The
MCP endpoint is at
/mcp/v1
and uses the same Bearer token as the REST API.
            POST /mcp/v1 HTTP/1.1
Host: your-domain.example.com
Authorization: Bearer YOUR_API_TOKEN
Content-Type: application/json
Available tool categories
| Category | Tools | Description |
|---|---|---|
| CRM | 14 | Contacts, tags, lists, notes, activities |
| Automation | 15 | Create, list, trigger, manage runs, approvals, templates, node types |
| Events | 6 | List, get, register, update capacity, cancel |
| Courses | 3 | List, get details, enroll students |
| Messaging | 3 | Conversations, messages, send SMS |
| Agency | 5 | Multi-tenant provisioning, snapshots, locations |
| Other | 15 | Groups, community, appointments, certifications, shop, reporting |
Automation MCP tools
The automation tools let AI agents create and manage workflows programmatically.
Webhook automations return a
webhook_url
field in all responses.
| Tool | Description |
|---|---|
| automation_list | List automations with filters |
| automation_get | Get full automation with definition |
| automation_create | Create from scratch or from template |
| automation_update | Update name, trigger, or definition |
| automation_delete | Delete an automation |
| automation_activate | Set status to active |
| automation_deactivate | Set status to paused |
| automation_trigger | Manually trigger a run |
| automation_list_runs | List runs with status filter |
| automation_get_run | Get run details with all steps |
| automation_cancel_run | Cancel a running automation |
| automation_list_templates | Browse pre-built templates |
| automation_list_node_types | List available node types |
| automation_list_approvals | List pending approval requests |
| automation_respond_approval | Approve or deny an approval |
Errors
Errors follow a consistent JSON shape. The HTTP status code indicates the category of failure; the body provides additional detail.
            {
  "errors": [
    {
      "message": "Resource not found",
      "code": "not_found"
    }
  ]
}
| Status | Meaning |
|---|---|
| 200 | OK. The request succeeded. |
| 201 | Created. The resource was created successfully. |
| 400 | Bad request. The request body or parameters were invalid. |
| 401 | Unauthorized. Missing or invalid Bearer token. |
| 403 | Forbidden. Your token does not have access to this resource. |
| 404 | Not found. The resource does not exist. |
| 422 | Unprocessable. Validation failed; see the errors array. |
| 429 | Too many requests. Slow down and retry after a short delay. |
| 500 | Server error. Please try again later. |
Next steps
Ready to build? Head to the interactive Swagger UI to browse every endpoint and try calls against your own account. If you'd rather work locally, download the spec from /api/docs/openapi.json and import it into your API client or code generator.